BUNQ LABS
bunqlabs.com
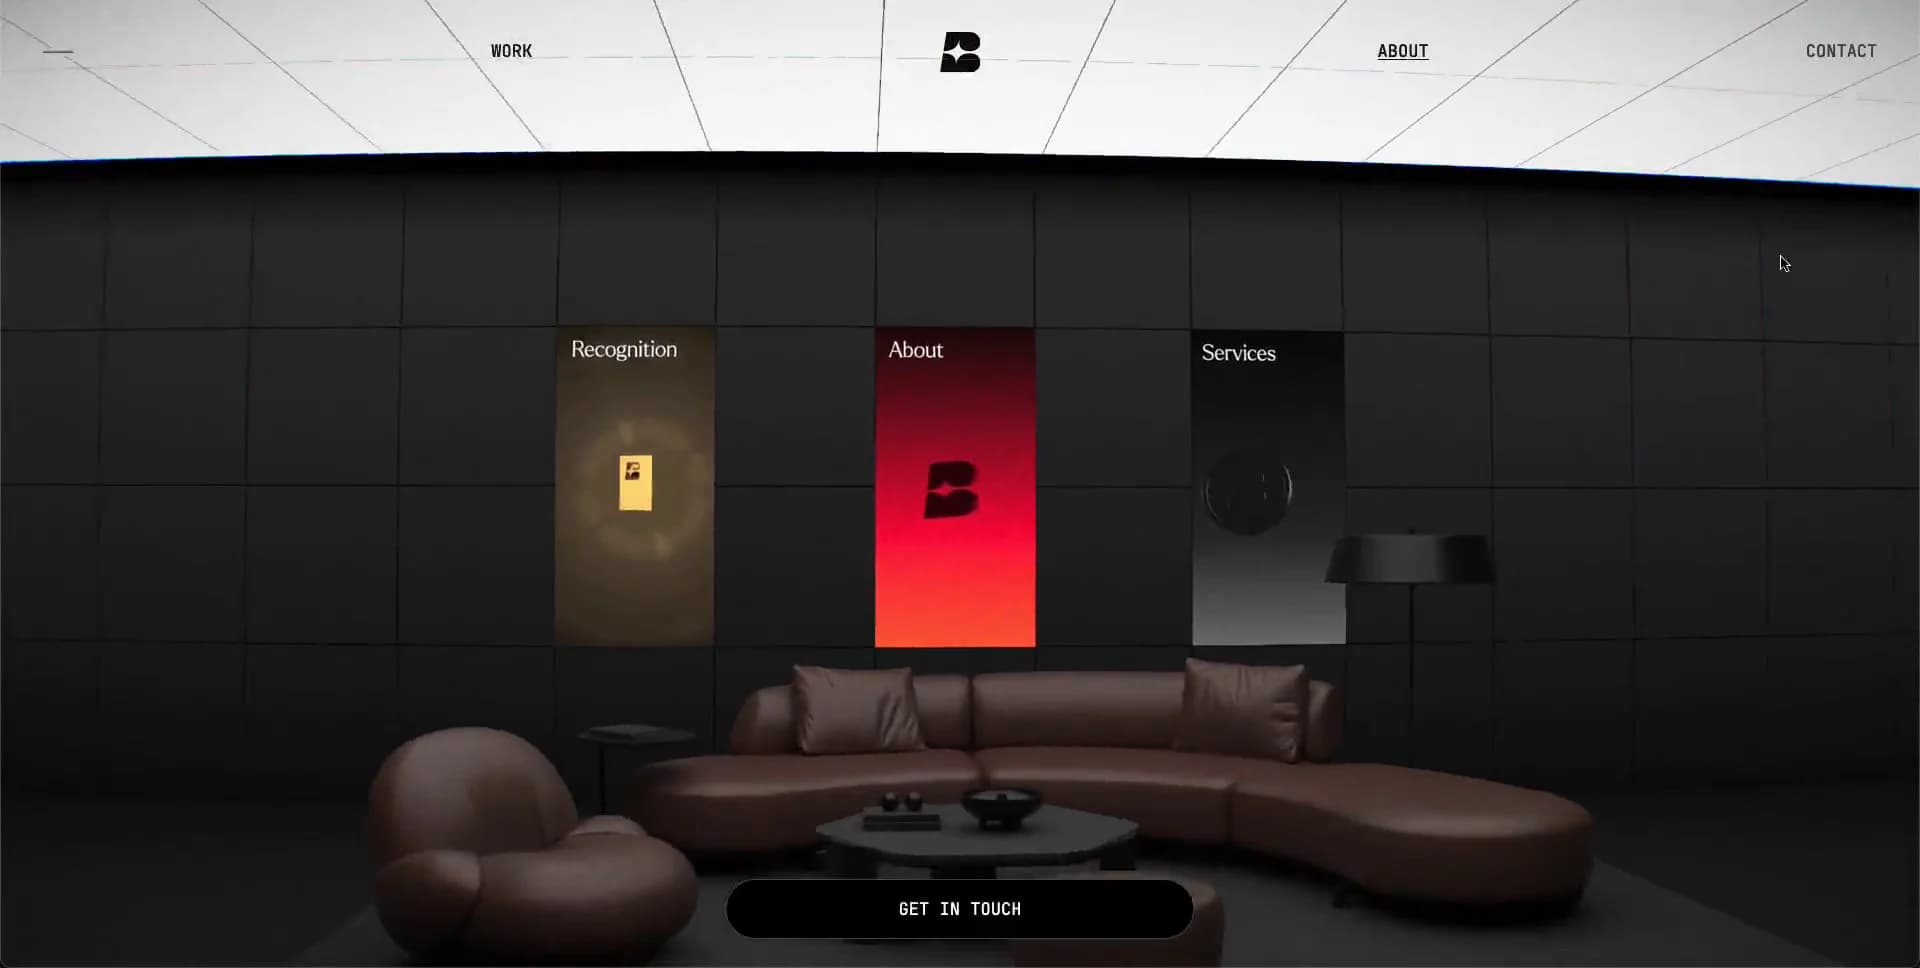
Studio
- 3D
- Animation
- Dark
- Editorial
- Minimal
- WebGL
Palette
Typography
Primary
LarkenSecondary
Inter TightMono
JetBrains Mono
About this design
A dark, cinematic studio portfolio that frames its work inside a continuous real-time 3D world, shifting from mountain monument to neon exhibition chamber, interior, and open water.
Prompts
Main build prompt
Build an original studio portfolio experience centered on one recognisable idea: a full-viewport, cinematic real-time 3D world that continuously carries the visitor through radically different environments while an extremely spare editorial UI stays fixed above it. Use the following dimensions and timings as reconstruction targets inferred from the reference, not exact measurements of the original implementation. Compose every scene for a 1920×968 (≈1.98:1) stage; preserve that ratio for posters, render targets, background plates, and fallback video.

Create a black opening state with only a small abstract white monogram at center. Over roughly 1.5–2.5 seconds, reveal a misty, near-monochrome mountain or crag occupying the lower 40–55% of the frame, a freestanding black rectangular portal behind it, and faint airborne dust. The environment should feel like a high-grain art film: near-black foregrounds (#020202), graphite surfaces (#242324 and #3b3b3b), fog-grey atmosphere (#9c9b9c), and cool off-white type (#dbdbdb). Reserve vivid colour for rare scene-local accents only: for example, a small scarlet geometric marker or a self-contained emerald-green project world. Do not use purple gradients, generic feature cards, glossy SaaS panels, testimonial sections, floating glassmorphism, or drop-shadow-heavy UI.

Render the scene with Three.js on a full-bleed WebGL canvas at z-index 0. Use a fixed DOM overlay at z-index 10: around 20–30px horizontal inset, place a tiny rule or utility mark at far left, a work link left of center, an abstract own-brand symbol at center, an about link right of center, and a contact link at far right. Set these labels in uppercase Inter Tight around 10–12px, firm weight, close line height and modest tracking. Use Larken for expressive display lines: around 72–96px on desktop, ~0.92–1.0 line-height, normal weight, with the typography spanning almost the full lower width when it enters. Use JetBrains Mono around 9–11px for metadata, labels, and CTA text.

Build four to five scene states: a foggy rock-and-portal opening; a dark portal with a framed project surface; a saturated green chamber where particles stream between two circular mechanical emitters; a dark architectural lounge with three tall illuminated panels and sculptural furniture; and a misty water scene viewed over the bow of a small boat. Let the camera and scene content move, rather than treating these as ordinary page sections. Keep the persistent navigation readable by dynamically switching between pale and dark text based on the scene luminance.

In the opening scene, introduce one giant original headline in Larken across the lower edge, broken into two visual phrases with a small saturated-red abstract separator. Do not reuse any wording from the reference. Add a compact black pill CTA centered near the lower edge, around 200–250px wide and 32–40px tall. In later scenes, use isolated project labels, a pair of thin circular previous/next arrow controls, and sparse mono metadata. In the water state, center a large two-line serif invitation in the upper-middle, a short mono supporting line below, and a small black pill CTA.

A practical recreation is a Three.js scene graph with separate environment groups and one camera route; use asset-light low-poly or scan-like geometry, baked texture detail, fog, volumetric-looking translucent planes, particles, and restrained post-processing. Do not make visual plausibility depend on expensive true fluid or volumetric simulations. Offer an accessible semantic HTML outline beneath/alongside the canvas: navigation landmarks, real buttons/links, text content, keyboard-operable scene controls, descriptive labels, and a reduced-motion alternate view made of still scene images with normal content flow. Lazy-load noninitial 3D assets, cap device-pixel-ratio around 1.5–2, pause rendering offscreen, and provide a poster-image fallback when WebGL is unavailable.
Build frontend
Structure the build as a React/Vite application with a SceneExperience shell that owns route/scene selection, loading progress, reduced-motion preference, pointer state, and scene luminance. Mount a CanvasStage component for the Three.js renderer and an HtmlOverlay sibling rather than putting normal UI inside the WebGL tree. CanvasStage receives activeScene, transitionProgress, reducedMotion, and onLuminanceChange; it owns renderer setup, camera, resize handling, render loop, scene disposal, and progressive asset loading.

Create scene modules with a common interface: create(), enter(), update(elapsed, transition), exit(), dispose(). Implement MountainPortalScene, GreenProjectChamberScene, LoungeScene, and WaterScene as isolated Three.js groups so materials, geometry, lights, and particle buffers can be disposed cleanly. Keep shared fog, renderer configuration, camera rig, grain overlay, and lighting utilities in a scene-core directory. Use GSAP timelines as a reconstruction choice for sequencing DOM overlays and camera target values; interpolate transforms in the requestAnimationFrame loop rather than causing React renders per frame.

HtmlOverlay contains TopNav, SceneCopy, ProjectControls, and PersistentContactCta. It receives only declarative scene metadata: theme, eyebrow, heading treatment, supporting copy, CTA label, and visibility flags. Maintain focusable controls in DOM in a stable order even when opacity changes. Use CSS custom properties for --ink, --paper, --scene-accent, --nav-ink, --fog-opacity, and safe-area insets. CSS Grid is appropriate for fixed nav alignment and centered copy; absolute positioning is appropriate for intentional foreground copy over the stage.

Use a small finite-state machine: boot, intro, idle, transitioning, and fallback. Debounce navigation activation while a transition is active. Keep scene data separate from JSX and use dynamic imports for noninitial scene factories. The no-WebGL fallback should swap CanvasStage for a semantic sequence of optimized still-stage sections retaining the same navigation, copy hierarchy, and CTAs.
Generate assets
Create original substitute assets rather than using any reference-site material. Prepare each visual stage at the observed wide 1.98:1 composition: use 1920×968 working previews and export high-resolution background or fallback plates at 3840×1936. The initial mountain scene needs a dark rocky terrain mesh or displaced plane, ideally with a procedural/royalty-cleared rock texture; texture it in desaturated charcoal with only pale ridge highlights. Keep it as real geometry where silhouette changes are visible, while distant haze can be a 2D or shader-like layered plane.

Make the freestanding portal and project surfaces as simple box geometry with separate emissive or unlit poster planes. Supply original fake project artwork as abstract editorial layouts: black side bars, off-white layout blocks, a small red mark, grid lines, and invented labels. Avoid recognizable client logos, slogans, or screenshots. Export these as SVG when text stays vector-clean, or WebP/AVIF at roughly 1600–2200px wide for baked editorial collage treatments. Use SVG viewBoxes sized to their native artwork, not arbitrary raster dimensions.

For the green chamber, create two dark circular emitter meshes with radial grooves and a simple dot-matrix-style texture strip. Populate the stream with a GPU-friendly BufferGeometry particle set, around several thousand small points, using one 64–128px alpha sprite or a procedurally drawn circular texture. The green light should be generated in the material and lighting code, not baked into every prop. An optional original low-detail asset from Meshy can accelerate furniture, vessel, or rock-blockout creation, but retopologize/simplify it and build the final visual identity through materials and lighting.

For the lounge, use a small original set of simplified furniture meshes: curved sofa, low coffee table, lounge chair, lamp, and three wall recesses. Prefer neutral PBR materials with restrained roughness variation; bake ambient occlusion into textures where practical. The water scene needs a boat-bow foreground mesh plus a tiling greyscale water normal map. A wide fog horizon and a few tiny bird silhouettes can be lightweight planes or sprites. Load GLB for geometry, KTX2-compressed texture assets where supported, and AVIF/WebP for DOM fallback plates. Keep alpha only where it is visually necessary, such as particles, mist, and feathered foreground grain.
Add animations
Treat the experience as a roughly 8–10 second cinematic introductory route followed by an idle interactive stage, not as a set of unrelated animated sections. Start in near-total black with the central own-brand symbol visible. Around 300–600ms, softly lift the fog and reveal the terrain silhouette; over the following roughly 1–2 seconds, pull the camera back and up to reveal the portal, mountain, and oversized foreground display line. Fade UI labels in late, using about 120–220ms opacity transitions and a subtle 4–10px vertical settle.

For reconstruction, drive camera travel with GSAP timelines that animate camera position and a separate look-at target, then apply those values during the render loop. Start with 1.2–2.2 second transition windows, an ease similar to power2.inOut for major location changes, and a brief ~150ms luminance crossfade on the DOM overlay. This is a recommendation: tune the path, framing, and timing visually so scene elements retain depth rather than appearing to slide like flat screens.

Give the mountain a near-imperceptible camera drift and move fog planes at different slow rates. Animate dust as a persistent particle field with low random velocity; update only its positions/offsets in a requestAnimationFrame loop and aim to keep total rendering within a ~16.7ms frame budget on a desktop target. In the green chamber, run a continuously descending or rising particle stream between two emitters, add a mild emissive pulse over roughly 2–4 seconds, and rotate the center project mark subtly. Use the arrow controls to transition scene state, with a 250–400ms pressed response before the larger camera movement begins.

For water, displace the water normal/UV offset continuously at a very slow rate and add a low-amplitude camera bob; do not simulate physical water. Give buttons and links an 120–180ms colour and outline response, plus a 1–2px transform nudge. The initial giant title may reveal with a 50–90ms per-word stagger, but avoid excessive character splitting. With prefers-reduced-motion, render the chosen scene as a stable poster or simplified static WebGL frame, retain gentle nonessential opacity fades only, and change scenes immediately with no long camera sweep.
Responsive polish
Design the desktop scene first around the 1920×968 reference composition, then make deliberate adaptations rather than merely shrinking it. At roughly 1200px and below, retain the full-bleed WebGL stage but reduce navigation side insets to around 16–20px, use a 54–72px display treatment, and move the central CTA upward enough to avoid browser chrome. Preserve the mountain/portal silhouette as the core opening composition; crop distant side detail rather than scaling the entire world down.

At approximately 768–1199px, keep the top bar in one row but shorten labels if your information architecture permits. Position giant display copy in the lower 15–25% of the stage and allow it to wrap into two or three intentional lines. Reframe the green chamber so its two emitters remain vertically legible and place prior/next arrows near the middle left and right with at least ~44px touch targets. Simplify the lounge by hiding distant minor props and retain only the sofa silhouette and brightest wall panels.

Below roughly 767px, use a tall mobile viewport composition with a camera preset rather than attempting to preserve the exact desktop crop. Keep the top navigation to a left menu/action, centered own mark, and right contact action; present work and about in an accessible overlay menu. Scale Larken display headings to about 40–52px with ~0.95 line height, and cap centered text blocks to about 11–13 characters per line only where it improves emphasis. Move the persistent pill CTA above the home-indicator safe area and make it at least 44px tall.

On phones, reduce scenes to one primary depth cue: mountain plus portal, one green particle emitter pair, sofa plus panels, or boat plus water horizon. Lower particle density and renderer pixel ratio, remove optional grain if it causes shimmer, and serve static fallback plates to constrained devices. Scene switching should work through obvious swipe-safe buttons or a compact scene selector, not depend on hover, scrolling precision, or cursor position. Keep all text as HTML and ensure it never becomes unreadable over the changing luminance; place a subtle dark scrim behind mobile copy when required.
Final visual polish
The final pass should prioritize cinematic restraint over adding UI. Tune every scene camera from the actual target viewport: the portal must look planted behind the mountain rather than floating, the boat bow must enter from the lower center with believable cropping, and the green project panel must be the dominant rectangle without becoming a flat full-screen card. Match the reference-like balance of vast blank atmosphere, small utility labels, and one giant display gesture.

Use optical alignment rather than mechanical centering. The centered own-mark in the header may need a 1–3px adjustment depending on its shape. Align nav baselines, not their bounding boxes. Keep uppercase mono labels crisp with very small but visible tracking; test Larken display lines for awkward kerning around punctuation and use manual line breaks at key widths. Apply font-display: swap or optional with carefully selected metric-compatible fallbacks to minimize layout shift.

Avoid crushed blacks: preserve a few layers between the #020202 ground and charcoal architecture so the 3D form remains legible. Conversely, avoid making the grey fog too white behind white labels. Maintain at least usable contrast for all interactive HTML text; use a scene-aware overlay colour token or a small translucent backing only when needed. Give every link and arrow a visible keyboard focus ring that is distinct from its hover treatment. Announce scene changes through a polite live region, and label icon-only arrows.

Prevent visual seams by preload-fetching the next scene's essential geometry and compressed textures before transition activation, then fade only after a ready state. Reserve the canvas/stage dimensions immediately to prevent layout shift. Test DPR 1, 1.5, and 2; throttle or lower particle count before sacrificing the fixed navigation. A first attempt commonly gets the scene too bright, overuses bloom, makes motion too fast, enlarges microtype, turns the editorial overlay into a conventional hero layout, or uses too many rounded cards. Remove those tendencies and preserve the quiet, severe, museum-film atmosphere.
These prompts describe a visual language: composition, rhythm, type scale and motion. Build with your own branding, copy, logos and imagery — the design and content of BUNQ LABS belong to their authors.
Build Recipe
Framework
- React
- Vite
Creative tools
- Meshy
Libraries
- Three.js· Detected
- Three.js
- GSAP
Special requirements
AI Replicability
84 / 100
Main remaining challenge
The design and branding of BUNQ LABS belong to their authors. InspoToCode documents its visual language as a reference; anything you build from it should carry your own branding, copy and assets.
Design analysis
- Buttons are approximately pill-shaped; scene panels and media surfaces are predominantly square-cornered.
- Small black capsules with fine light outlines or high-contrast light labels; compact mono uppercase text.
- Avoid conventional cards. Project information appears as large environmental panels, portals, and tall wall-mounted posters.
- Lighting and ambient occlusion belong to the 3D environment; UI itself is almost shadowless.
- Hairline low-contrast charcoal rules, circular arrow outlines, and thin panel seams define the interface.
- Very generous viewport-scale negative space, with tightly tracked microcopy and deliberately sparse information clusters.
- Full-bleed 1920×968 reference stage, with a fixed top navigation inset roughly 20–30px from each edge.
- A thin, fixed four-point navigation bar: left mark/line, work, centered symbol, about, and contact at right.
- High-contrast, near-monochrome cinematic 3D environments; occasional saturated red or luminous green appears inside individual project scenes.
- Atmospheric black-to-grey fog gradients and scene lighting rather than decorative UI gradients.
- A fixed editorial UI layer sits above a continuously changing full-viewport 3D scene; copy can enter as giant foreground type or centered editorial blocks.



